
How to check shoes fit a flip-down cabinet
Compare shoe length, pair width and local movement restrictions with worked checkpoint calculations before choosing a flip-down cabinet.
The main decision
Check the whole shoe as the compartment tilts
Measure your longest shoe and your bulkiest pair. Compare both with the usable space inside the exact compartment, including its divider. A shoe can fit in the open bin and still catch as the flap closes.
Measure the shoe from heel to toe, including the sole
Put each candidate shoe on a flat surface with the sole resting naturally. Hold one straight edge at the farthest part of the heel and another at the farthest part of the toe. Measure between them. The toe box may end earlier than the sole, and a running shoe's heel can project past its upper.
Record the width at the widest point and the height from the floor to the highest part of the shoe. A walking boot may have a shorter sole than your longest trainer, yet its collar can catch the cabinet's upper rail. Measure the pair that looks tallest or thickest as well as the longest one.
Put both shoes down in the orientation you plan to use and measure their combined width. This can be different from twice one shoe's width, especially if you alternate toes and heels. Check that you can grip either shoe without levering against the divider. Your own measurements are more useful than an advertised pair count.
Use the space inside the compartment
Find the opening between the supports, the internal span along the shoe and the clear space above the sole. Use the narrowest point when the bin is tapered. A front rail, hinge cover or central divider may take up room that is present elsewhere in the compartment.
Use documented compartment dimensions with the divider in the position you would use. With two rows, the back row can have a different profile or be harder to reach. If you remove an adjustable divider, follow the instructions and check what capacity remains in that configuration. A claimed total for two rows may no longer apply.
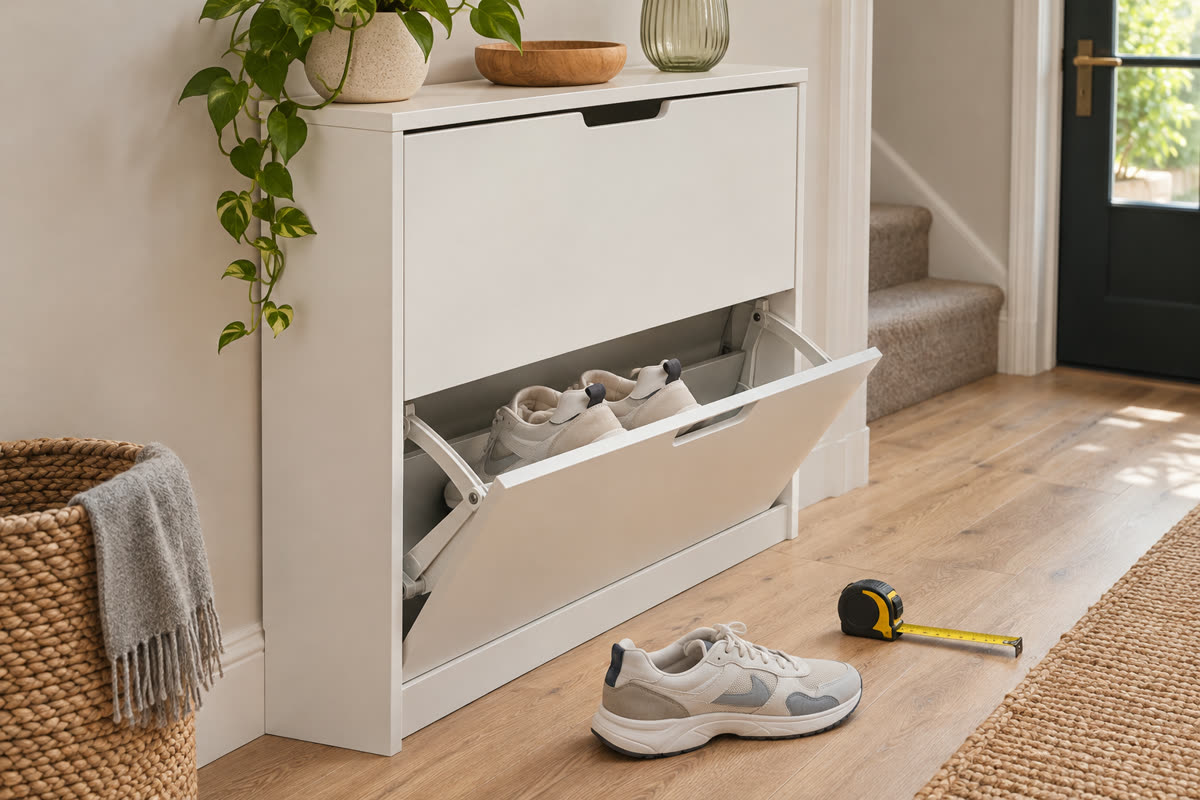
The VASAGLE cabinet below has a 24 cm closed body and two flaps with an adjustable divider. It is an example of how a change in row layout can give different space inside. Use the exact compartment measurements or try your shoes in an assembled example before assuming either row will fit.
Adjustable compartment layout
VASAGLE white two-flap shoe cabinet
Two flaps have adjustable, removable dividers so you can change how the available space is divided.
- Outside · W × D × H cm
- 60 × 24 × 83.5
- Access
- Two flip drawers
- In the pack
- One cabinet
What to check Use the supplied anti-tip fixing. Removing a divider changes the number of rows. Confirm the biggest shoe clears the full movement.
View on Amazon — VASAGLE white two-flap shoe cabinetCheck the path through the complete tilt
The shoe moves with the drawer. Start by placing it in the open bin as the manufacturer shows. Keep the tongue and laces in their normal position, and make sure the sole is properly supported. Close the compartment slowly while watching the points where the toe, heel or collar come closest to a fixed part.
A cardboard side profile of your longest shoe can help identify a possible clash in a display model if you cannot take the pair. Use its real outside length and height. A flat profile does not show width, sole flare or how a soft upper moves, so confirm a close fit with the real shoes when you can.
Check room outside the furniture at the same time. With the flap at its most projecting position, measure to the handle or outer edge and compare with the rest of the hallway. Make sure someone can stand where they need to reach the shoes without blocking a door. The hallway measuring guide shows how to record installed and open dimensions.
Compare resting space with a separate movement checkpoint
We calculated four checks using an illustrative 32 cm resting span and 24 cm clear row width. Each pair’s combined width is measured in its intended arrangement, rather than inferred from a shoe-size label. A separate 11 cm local clearance represents one restriction during movement. None of these compartment figures is a specification for the featured VASAGLE cabinet.
The required profile height at that checkpoint is an explicit input. It must be measured in the same reference as the local clearance at that position; it is not obtained by carrying the shoe’s standing height unchanged through a rotation. These comparisons can identify a stated conflict, but cannot simulate the whole mechanism.
Swipe to compare all three dimensional differences.
| Shoe example | Sole length / pair width | Length difference | Pair-width difference | Required checkpoint height | Checkpoint-height difference |
|---|---|---|---|---|---|
| Long trainer | 31 / 22 | 1 | 2 | 12 | -1 |
| Shorter, taller boot | 29 / 24 | 3 | 0 | 16 | -5 |
| Lower-profile pair | 28 / 20 | 4 | 4 | 8 | 3 |
| Trainer, checkpoint unknown | 31 / 22 | 1 | 2 | 12 | Not assessed: clearance unknown |
Length comparison · resting position
A shorter sole is only one advantage
The reference span is 32 cm. The trainer uses 31 cm and the boot 29 cm. The remaining 1 and 3 cm are differences along the resting span, not space for a hand or proof of support.
The shoe upper, combined pair width, divider and complete closing path still need their own measurements.
Height comparison · one checkpoint
The local restriction changes the result
Against 11 cm of local clearance, the trainer needs 12 cm and the boot 16 cm. The lower-profile example needs 8 cm and leaves a 3 cm difference at this one check. It remains a candidate for the other checks, rather than a confirmed fit.
If the local clearance is unknown, record “not assessed”. The cabinet’s 24 cm outside depth cannot supply an internal height or a moving clearance.
Use the comparison to choose the next measurement
A negative length difference excludes that resting arrangement. A negative checkpoint difference identifies a conflict at that measured position even if the resting dimensions are positive. A zero difference gives no spare dimension to accommodate measurement uncertainty or a different loaded shape.
For a pair with positive differences, continue along the whole permitted tilt, including the toe, heel, collar, divider and neighbouring row. Do not remove or reposition a fixed component to turn a conflict into a positive result. Where the critical compartment or movement measurements are unavailable, leave the result open and compare a format whose usable space can be established.
An ankle boot with a 29 cm sole and a 16 cm collar could be harder to store than the longer trainer. Make a short list by shape and check one representative pair from each group. Place the largest pairs first when trialling a full compartment. That shows how much space remains for slimmer footwear.
If one pair catches, try the alternate divider position only where it is intended. Stop before forcing a flap or folding a boot shaft into the bin. A low open rack is often easier to check for tall or wide shoes. A separate boot station can keep muddy pairs clear of the dry cabinet.
When you shop, record the exact model and variant alongside the shoe measurements and the open projection. Two units with a similar front and the same quoted depth can have different bins. The slim cabinet comparison helps narrow down the body size before you do this fit check.
Questions before you choose
Can I use UK shoe size to check a cabinet compartment?
Use the actual outside shoe length, combined pair width and relevant profile at each restriction. Size labels do not include the external toe, heel flare or collar. Compare measurements taken in the same reference.
Does a 24 cm cabinet take a 24 cm shoe?
The figure describes the closed outside cabinet depth. It does not supply an internal resting span, row width or moving clearance. Use the exact compartment and permitted divider arrangement.
Can I remove a divider to fit boots?
Only adjust or remove it where the exact instructions permit. A different row layout changes usable space and capacity, but the boot must still clear the complete movement and remain supported.
Why can a shoe fit in the open bin but catch while closing?
Its toe, heel or upper approaches fixed parts as the bin moves. A positive resting-length difference does not establish clearance at every checkpoint. Stop if the flap meets resistance rather than forcing it.
What if an important compartment measurement is unknown?
Leave that check unassessed. Outside dimensions and a photograph cannot supply the missing internal or moving clearance. Compare another documented arrangement or a format whose usable space can be established.
How we put this guide together
The example uses the documented dimensions and divider arrangement of the VASAGLE LBC02WT. The diagram and worked figures illustrate the checks and do not specify that model's internal dimensions.
Our comparison uses the inputs below and the stated formulas. Room dimensions and handling allowances are illustrative; named product dimensions are kept separate from them. Analysis prepared November 2026.
- Length difference = usable resting span − outside shoe length.
- Pair-width difference = clear row width − measured combined width of the pair in the proposed arrangement.
- Checkpoint-height difference = local clear height − required shoe-profile height measured in the same reference at that checkpoint.
Calculations use unrounded inputs. Displayed results are rounded to two decimal places where necessary.
- The 32 cm resting span, 24 cm row width and 11 cm checkpoint clearance are illustrative, not LBC02WT internal dimensions.
- Every shoe and pair measurement is illustrative. Required checkpoint height is a separate input, not calculated by rotating the resting shoe height.
- A checkpoint is a local measured restriction with both dimensions taken along the same reference. It is not a full kinematic model or a claim about a particular hinge or angle.
- Positive length and width differences do not establish support, grip, divider clearance or the entire movement. Zero difference leaves no numerical clearance.
- Unknown checkpoint clearance remains unassessed, not zero. Exact cabinet geometry, permitted divider settings, fixing and maximum external opening must be checked separately.
Sources: VASAGLE LBC02 manufacturer specification and divider arrangement.